lab07a : Spring Boot Skills
| num | ready? | description | assigned | due |
|---|---|---|---|---|
| lab07a | true | Spring Boot Skills | Thu 11/07 05:00PM | Wed 11/13 11:59PM |
A few updates if you are having trouble getting the app running on Heroku.
We added two items to Step 5.
-
You need to copy a file called
system.propertiesfrom the starter repo into the root directory. See the instructions for Step 5b for details. This is needed for running Java 11 on Heroku. -
For the 5pm and 6pm labs, there was an error in
pom.xmlat line 186. (It was fixed before the 7pm lab started).Check what you have on line 186 to make sure you have the correct version:
WRONG: <mainClass>edu.ucsb.cs56.pconrad.menuitem.MenuItem</mainClass>CORRECT: <mainClass>hello.Application</mainClass>
This lab builds on your work from lab06.
What if I didn’t finish lab06
If you were not successful in completing lab06, you should go back and complete any unfinished steps from lab06 first. You will get partial credit for this lab simply for doing the unfinished steps from lab06, even if you missed the deadline for lab06
Individual lab
This is an individual lab on the topic of Java web apps on Heroku.
You may cooperate with one or more pair partners from your team to help in debugging and understanding the lab, but each person should complete the lab separately for themselves.
Goals
You will learn:
-
How to set up a repo for automated testing with Travis-CI. This kind of automated testing is called “continuous integration”.
-
You’ll make a few simple changes to static HTML, along with unit tests for those changes. In the process you’ll learn about making clean git commits that combine tests and changes.
-
You’ll then add an HTML form using Thymeleaf that can gather some information from a user, and echo back that information on another page.
Initially, that page is just a placeholder. But we’ll see that we can do some testing to ensure that the page contains the correct elements.
-
Finally, you’ll learn how to request data from an API, and display that data to the user.
Throughout, most of the steps will be pretty cookbook. You’ll be walked through most of what you need to do. These are skills though, that when you do this in the context of a project, you’ll have to figure out for yourself.
How we will proceed
Here is an overview of how the lab will go. These are not the detailed instruction; those follow later on this web page. This is just an outline so that you can get the big picture before you start.
-
We will start with a new, empty, public repo called:
- lab07-githubid.
We are making the repo public so that we can set up Travis-CI; the free tier requires the repo to be public.
-
We’ll then add a remote for our code from lab06, and pull in that code as our starting point.
-
We’ll next see that when we type
mvn testsome of the unit tests in the starter code are not passing.We’ll create a bug fix branch in which we make the necessary changes to fix this.
We’ll then do a pull request on that branch.
Finally, we’ll merge that branch into master.
-
Next, now that our test cases are passing, we’ll set up the javadoc, website, and jacoco report, and publish it to github pages on the master branch.
-
We’ll then get the app running on both localhost and Heroku as we did for . For
localhost, this should be straightforward; we can reuse the localhost credentials from . For Heroku, we’ll have to create a new Github OAuth client id and client secret, since the Heroku URL will have changed.
That’s all we’ll do in lab07a. However, we’ll continue with this same code in lab07b. Lab07b will have these additional steps:
-
We’ll then set up the repo for Travis-CI. This allows us to ensure that all of the test cases are run automatically each time we do a pull request from a branch.
-
We’ll then create a feature branch with
git checkout -b branchNameto make some small, simple changes to the static HTML along with writing test cases for those changes. In the process we’ll discuss writing good commit messages, making frequent small commits, and combining changes with the test cases for those changes in single commits.
We’ll finish this step by doing a pull request for that branch, and then merging it into master.
-
We’ll now create a second branch for creating a form.
On this branch, we will create a simple HTML form using Thymeleaf.
We’ll need to add a controller method that routes the user to this form, and be sure that a link on the navigation menu routes to this page.
That page will gather some information from the user, and then echo that information back on a second “results” page.
This is an intermediate step; echoing the information back is not useful in and of itself. In the next step, we’ll do something useful with that information.
This step will end with a second pull request. You should then merge that pull request into master.
-
In this step, we’ll make yet another branch where we do something useful with the information on the results page. We’ll make a call to an API that provides information in JSON format.
In this step we’ll only echo that JSON information on the page; it won’t yet be in a format that is pleasing to an end user. But we’ll be able to see that we are making progress.
-
In this final step, we’ll learn how to transform that JSON string into usable Java objects, and use those Java objects to put useful information on the page.
There will be one final pull request at this stage, and we’ll be done.n
Step by step instructions (lab07a)
Step 1: New empty public repo
We will start with a new, empty, public repo called:
- lab07-githubid.
We are making the repo public so that we can set up Travis-CI; the free tier requires the repo to be public.
Step 2. Add remote for lab06
Now add a remote for the code from your lab06 repo:
git remote add lab06 git@github.com:ucsb-cs56-f19/lab06-githubid.git
Then, to pull the code from your lab06 work into this new repo, use:
git pull lab06 master
Finally, to push this to github, do:
git push origin master
Check that you see your code on github under the repo name lab07-githubid.
Note: you will need to copy localhost.json, heroku.json, and env.sh from your lab06 folder to the root directory of this lab, or recreate them as detailed in lab06. Then you should run source env.sh in the root directory of this lab.
Step 3: Fixing tests in a bug fix branch.
Step 3a: Seeing that there are test failures
Now, type mvn test. You’ll see that there
are some test failures.
We are going to create a separate branch in github in which we fix those problems, and then we’ll do a pull request to merge that branch into master.
Step 3b: Pull from master
Now, to be sure you have the latest code (in case you changed anything on another computer, or on github), do this in your terminal before proceeding:
git pull origin master
Step 3c: Create a feature branch
We will now create a feature branch. The first two letters should be your initials, e.g. pc, ab, etc.
The rest should be fixFailingTests. So the branch name will be something like pcFixFailingTests or abFixFailingTests.
Type this (but not literally xx unless your first and last name both start with x)
git checkout -b xxFixFailingTests
Step 3d: Fix the tests
Now we are ready to look at the code that needs to be fixed.
Running mvn test shows us two tests that are failing:
HomePageTest.getHomePage_BootstrapLoaded:43 Status expected:<200> but was:<302>
[ERROR]   HomePageTest.getHomePage_hasCorrectTitle:54 XPath //title expected:<Getting Started: Serving Web Content> but was:<Title of your page goes here>
Let’s tackle these one at a time.
First, open up the file src/test/java/hello/HomePageTest.java and look for the method getHomePage_hasCorrectTitle at line 54.
Notice that this comes directly from the test failure message. JUnit test output may look very messy at first, but when you learn how to read it, you can find exactly where to go in the code to fix a problem.
What we see is that this test is looking for the <title> element on the home page (i.e. /).
It is looking for that to be the value
Getting Started: Serving Web Content
But what it is finding instead is:
Title of your page goes here
Neither of those, however, is really a good title for our page. Let’s change the test so that it is looking for:
CS56 Spring Boot Practice App
After making this change, run the test again with , and it should fail again, but with the message that it was expecting "CS56 Spring Boot Practice App" and it got instead "Getting Started: Serving Web Content".
Now, we need to find the actual place in the code that has the content Title of your page goes here. Note that when we search for it, we should NOT include the "", since those might or might not be part of the code; it depends on where that value is coming from (HTML code, JavaScript code, Thymeleaf template, or Java code).
If you are using a IDE that allows you to search across multiple files, you can use that to search for the string. However, if you don’t know how to do that, it is handy to know this Unix trick you can use at command line.
mvn clean
grep -r "Title of your page goes here" .
The grep -r command recursively searches a directory for a string. The "" here are not part of what is being searched for; they tell the Unix shell that "Title of your page here" is one argument to grep. The . signifies the curent directory.
Here’s the output I got:
pconrad$ grep -r "Title of your page goes here" .
./src/main/resources/templates/page1.html:    <title>Title of your page goes here</title>
./src/main/resources/templates/index.html:    <title>Title of your page goes here</title>
./src/main/resources/templates/page2.html:    <title>Title of your page goes here</title>
pconrad$
We can see that this string appears in three files, all of them html files under src/main/resourcs/templates. The one we want is index.html, since that is the home page of the application.
Side note: I do a mvn clean first before I do the grep -r. That’s because if I don’t, the grep -r will also search my target directory and come up with many distracting false hits. The mvn clean gets rid of the target directory. (It will come back each time I use mvn commands to build my project.)
Now, back to coding: change the <title> element in index.html to the string in our test.
It should look like this (probably on line 4):
<title>CS56 Spring Boot Practice App</title>
Re-run mvn test. The test should now pass.
Step 3e: Commit the changes
So, now that the tests are passing, we’ll do a commit with a commit message, where xx is replaced by your initials:
git commit -m "xx - fix failing test for title element on home page"
Then, do this (remembering to replace xx with your initials for branch name:)
git push origin xxFixFailingTests -u
The -u specifies the upstream for git. It makes that remote (origin) and branch (xxFixFailingTests) the default for git push unless and until you change the upstream to something else. This is handy if you are going to be doing many commits in a row on the same branch.
We are now going to tackle the other failing test.
The message on this one is:
HomePageTest.getHomePage_BootstrapLoaded:43 Status expected:<200> but was:<302>
The status code here refers to an HTTP status code. Each time we make a web request, if we get back a response, that response contains a status code.
The status code 200 is we get back a reponse 200, which signifies OK, i.e a normal successful completion of the request.
What we got instead was 302, which signifies Found. This is used when a URL is being redirected to another URL.
This is typically a symptom that we are trying to access a page that requires authentication without being authenticated yet. However, note that this test is supposed to be access the home page, which typically does NOT require authentication.
As it turns out, the test has a simple typo in it. The test code looks like this:
@Test
    public void getHomePage_BootstrapLoaded() throws Exception {
        mvc.perform(MockMvcRequestBuilders.get("/").accept(MediaType.TEXT_HTML))
                .andExpect(status().isOk())
                .andExpect(xpath(BootstrapLiterals.bootstrapCSSXpath).exists());
        for (String s: BootstrapLiterals.bootstrapJSurls) {
            String jsXPath = String.format("//script[@src='%s']",s);
            mvc.perform(MockMvcRequestBuilders.get("/greeting").accept(MediaType.TEXT_HTML))
              .andExpect(status().isOk())
              .andExpect(xpath(jsXPath).exists());
        }
    }
What is happening here is that the test is trying to load the home page (get("/")) and then it makes sure that the page loads ok.
It then tries to ensure that the CSS file for Bootstrap loaded ok.
Finally, it checks that three different JavaScript files loaded ok; it does that in a loop. But here, we find the typo:
MockMvcRequestBuilders.get("/greeting")
That is trying to access the page /greeting which is a page that doesn’t even exist in the web app anymore! Instead, that call should read:
MockMvcRequestBuilders.get("/")
Note: the part that comes before and after should remain unchanged, so the entire line after the change should read:
mvc.perform(MockMvcRequestBuilders.get("/").accept(MediaType.TEXT_HTML))
Make this change. Then try running mvn test again.
Note: If the tests don’t pass because of a “compilation problem” where the class BootstrapLiterals cannot be found, try doing
mvn clean test instead. This cleans out all of the old compiled code before running the test; it’s equivalent to doing:
mvn clean
mvn test
I have found that sometimes if you get compilation problems, doing a mvn clean makes them go away. Not always; sometimes you really did miss a semicolon or something. But if it’s saying that a given class is not there, when it clearly is, sometimes it’s just confused, and a fresh compile fixes things.
At this point, you should have a clean mvn test run. If so, commit your second change to HomePageTest.java (remember, your initials, not xx)
git add src/test/java/hello/HomePageTest.java
git commit -m "xx - fix typo in test cases for bootstrap"
git push
Step 3f: Pull Request
You should now be ready to do a pull request from this branch to master.
You can do this by going to the pull request menu on github.com for your repo.
Here’s what a PR should look like for this branch:
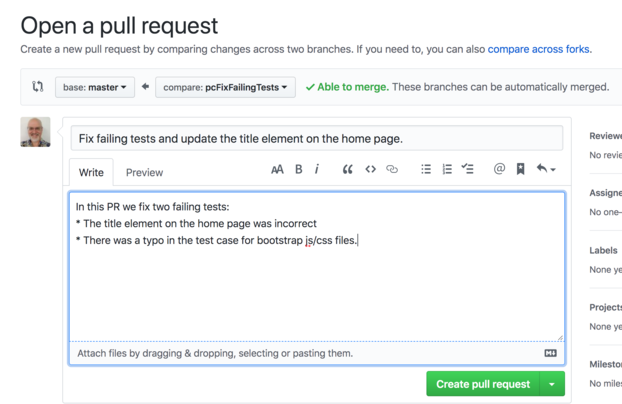
Create the pull request.
Then merge the pull request into the master branch. You do this on the Github website by clicking the green “Merge” button.
After you do that, at the command line, do this:
git checkout master
git pull origin master
This should pull the changes into the master branch on your local repo. Try running mvn clean test again to be sure.
Then you are ready for the next step.
Step 4: javadoc, jacoco, website
We’ll set up the javadoc, website, and jacoco report next, and publish it to github pages on the master branch.
Step 4a: Fix some javadoc problems
First, though, we’ll have to fix some Javadoc issues. In this case, we’ll work directly on the master branch, because we want to be able to see the javadoc publish on github pages. This is a rare exception to our general rule of working only on feature or bug fix branches.
Start by running the command mvn javadoc:javadoc.
You’ll see that there are some issues in the file src/main/java/hello/MembershipService.java.
In particular, a few methods have javadoc comments that lack the @param and @return items. We’ll fix that. I’ll show you how to do the first one, and you’ll figure out how to do the other two.
Change the javadoc for the isMember function from:
 /** is current logged in user a member but NOT an admin
     * of the github org */
To:
   /** check membership
     * @param oAuth2AuthenticationToken oauth token
     * @return is current logged in user a member but NOT an admin of the github org?
     * */
Make similar changes for the next two methods, as well as the hasRole method in /src/main/java/hello/GithubOrgMembershipService.java
Then run mvn javadoc:javadoc, and you should
see a clean run.
Commit this change with an appropriate commit message.
Step 4b: Fix the pom.xml
Next, we’ll need to make a change to the pom.xml so that deploying the website works properly.
In the repo https://github.com/ucsb-cs56-f19/STARTER-lab07 there is a pom.xml that you should copy into your repo, replacing the current pom.xml.
Next, create a directory called src/site and copy the file site.xml from https://github.com/ucsb-cs56-f19/STARTER-lab07 into src/site/site.xml.
Then commit these changes (the new pom.xml and the new src/site/site.xml)
Step 4c: Generate Jacoco Report
Next, run these commands:
mvn javadoc:javadoc
mvn test
mvn jacoco:report
mvn site
mvn site:deploy
git add docs
An update:
Note: You can also do this step, which was NOT in the original instructions for lab07a when published.
mvn javadoc:test-javadoc
mvn site:deploy
git add docs
That should fix the problem that the link to Javadoc (test code) is a dead link. Since this wasn’t part of the original instructions, we will not check that link when grading lab07a
Then do a git status. You should see under the docs directory that you now have an index.html file as well as a subdirectory for apidocs and a subdirectory for jacoco.
Step 4d: Commit docs directory to master branch
Use these commands to push these changes to github pages:
git commit -m "add javadoc and jacoco report"
git push origin master
Step 4e: Set up GitHub pages
Then, visit the settings page of your repo, i.e.
Find the section where you turn on GitHub pages. Turn this on, and then visit the page. You should see a web page with links to your javadoc, and your jacoco report.
Make sure it works before moving on.
If it does, then do an additional commit where you add a link to the web page of your documentation into your README.md, i.e. a link to this URL (where githubid is replaced with yours)
https://ucsb-cs56-f19.github.io/lab07-githubid/
Commit this change to the master branch.
Step 5: Deploy app on localhost and heroku
Now, we’ll get the app running on localhost first, then heroku.
Step 5a: Running on localhost
To get it running on localhost, copy the localhost.json from the directory where you worked on lab06 into your current directory. You should be able to reuse the client-id and client-secret values, since you are still running on the same web address, i.e. http://localhost:8080.
Type mvn spring-boot:run and see if you can access the web app, login, and logout.
Step 5b: Running on Heroku
Next we’ll try getting the app running on Heroku.
The first step is that we need to add one more file from the https://github.com/ucsb-cs56-f19/STARTER-lab07 repo. Copy the file system.properties from that repo into the root of your lab07a repo. This file contains one line:
java.runtime.version=11
According to this article this is needed if you are using Java 11 on Heroku (instead of Java 8).
Then, following the same steps as you did in lab06, get your app working on heroku, under the app name cs56-f19-lab07-githubid.
That is, your URL should be:
cs56-f19-lab07-githubid.herokuapp.com.
You’ll have to set up a new Github OAuth app. You can find the instructions in the README.md for the starter code from lab06 which you copied into your current lab.
Once you have your app running on heroku, put the link to the running app in the README.md, commit this change with an appropriate commit message, and push that change to master.
Final Step: Submitting your work for grading
When you have a running web app, visit https://gauchospace.ucsb.edu/courses/mod/assign/view.php?id=2786079&forceview=1 and make a submission.
In the text area, enter something like this, substituting your repo name and your Heroku app name:
repo name: https://github.com/chrislee123/spring-boot-minimal-webapp
on heroku: https://cs56-f19-lab07-chrislee123.herokuapp.com
Then, and this is super important, please make both of those URLs clickable urls.
The instructions for doing so are here: https://ucsb-cs56.github.io/topics/gauchospace_clickable_urls/
Grading Rubric:
TBA. It will be 100 points divided across the five steps in the lab.
| Rubric Item | Points |
|---|---|
| Clickable links on Gauchospace to repo and running Heroku app | 10 |
| Heroku app comes up ok | 10 |
| OAuth works | 10 |
Title is CS56 Spring Boot Practice App |
10 |
Test case for CS56 Spring Boot Practice App |
10 |
There is a branch named xxFixFailingTests |
10 |
| There is a pull request for fixing the failing tests | 10 |
| The README.md has a link to the GitHub pages webpage | 10 |
| The GitHub pages webpage links to javadoc | 10 |
| The GitHub pages webpage links to jacoco report | 10 |