lab07b : Spring Boot Skills Part 2
| num | ready? | description | assigned | due |
|---|---|---|---|---|
| lab07b | true | Spring Boot Skills Part 2 | Thu 11/14 05:00PM | Wed 11/20 11:59PM |
UPDATE:
- There are updates at step 6b and at step 8h, each of which is necessary to get your code to pass the tests on Travis-CI.
- Please be sure you revisit those steps, apply the necessary changes, and commit those changes to the master branch of your repo before the assignment due date.
This lab builds on your work from lab07a.
What if I didn’t finish lab07a
If you were not successful in completing lab07a, you should go back and complete any unfinished steps from lab07a first. You will get partial credit for this lab simply for doing the unfinished steps from lab07a, even if you missed the deadline for lab07a
Individual lab
This is an individual lab on the topic of Java web apps on Heroku.
You may cooperate with one or more pair partners from your team to help in debugging and understanding the lab, but each person should complete the lab separately for themselves.
Goals
See Goals section of lab07a.
Picking up from step 5 of lab07a.
Please return to your same repo:
- lab07-githubid.
We will work with this repo, and with the Heroku app you configured for
Step by step instructions
Step 6: Set up repo for Travis-CI
We’ll start this lab by setting up our repo on Travis-CI.
Setting up our repo on Travis-CI will set it up for “continuous integration”—that’s what CI stands for.
Continuous integration means that we try to integrate new code into the code base early and often, and that we run all of the tests of our code base each time we do that.
With Travis-CI setup, each time you push code to GitHub, or do a pull request, a server in the cloud (at the Travis-CI.org website) will pull your repo, and run all of your JUnit tests. You’ll get an indication on the GitHub site for your repo whether the tests passed or not.
Step 6a: Add a .travis.yml file to your repo
To set up your repo for Travis-CI, the first step is to copy the two line file .travis.yml from the starter code repo https://github.com/ucsb-cs56-f19/STARTER-lab07 into the root of your repo. (For this change, we’ll make an exception and just do it directly on the master branch.)
So, please copy that file in to your repo, and do:
git add .travis.yml
git commit -m "xx - add .travis.yml for Travis-CI"
git push origin master
Step 6b: Fix unit tests so they work without OAuth
UPDATE:
This step was missing in early versions of the lab. If you are are coming back to this step,
it’s ok to make the following changes directly on the master branch. It’s also fine to make a
separate xxFixTravisCI branch and do a pull request. Your choice.
The next step is to adjust our unit tests so that they can run without the OAuth secrets and the integration with GitHub.
When we run on Travis-CI, we don’t have access to the client-id and client-secret that is defined in our localhost.json and heroku.json files.
While it is possible to set up Travis-CI to have access to those, there is a better way. It involves “mocking” some of the parts of our application that are not being tested.
To do that, make the following changes to your code.
-
In
pom.xml, add this dependency. It can go anywhere in the<dependencies>section, in between two other<dependency>elements:<dependency> <groupId>org.mockito</groupId> <artifactId>mockito-core</artifactId> <version>2.22.0</version> <scope>test</scope> </dependency>This update
Mockito, which is a piece of software that lets us create “Mock Objects” for testing. -
In the file
src/test/java/hello/HomePageTest.java, we are going to make a few changes. Here’s the first.First add these three imports:
import org.springframework.security.oauth2.client.registration.ClientRegistrationRepository; import org.springframework.boot.test.autoconfigure.web.servlet.WebMvcTest; import org.springframework.boot.test.mock.mockito.MockBean; -
Next, find these lines of code:
First add this import:
@RunWith(SpringRunner.class)
@SpringBootTest
@AutoConfigureMockMvc
public class HomePageTest {
And change them to:
First add this import:
@RunWith(SpringRunner.class) @WebMvcTest(WebController.class) public class HomePageTest { -
Finally, find these two lines of code:
  @Autowired
  private MockMvc mvc;
and immediately after, add these:
@MockBean private AuthControllerAdvice aca; @MockBean private ClientRegistrationRepository crr; -
Next, try running your unit tests with
mvn testin a new terminal window where you did NOT dosource env.sh. If they pass, then you know you did this step correctly, and your tests should pass on Travis-CI. -
Finally, commit all of these changes with a commit message that says something like:
xx - mock dependencies for unit testing
It’s ok to commit this directly on the master branch.
NOTE: If you are doing step 6b after already setting up Travis-CI, now is the time to try to manually trigger a build and see if it gives you a green check. The instructions to do that are part of Step 6c.
Step 6c: Set up repo on travis-ci.org website
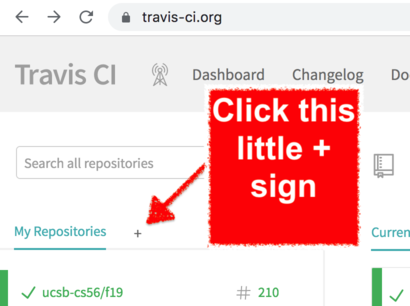
The next step is to visit the following website, and login with your GitHub account:
Once there, at the upper left hand corner of the dashboard, you should see a small plus sign next to the text “My Repositories”. You want to click this + sign as shown in this image:
That takes you to a page where you can add the ucsb-cs56-f19 GitHub organization to your authorized organizations for Travis-CI.
You might have to scroll down the left column where the text says:
MISSING AN ORGANIZATION?
Review and add your authorized organizations
On the page, the text “review and add” is a link; if you click it, you should be able to enable Travis-CI access for ucsb-cs56-f19.
Once you do that, you should be able to see the organization ucsb-cs56-f19 in the left hand column. If you click on it, you should then be able to see your repo, and enable it for Travis-CI by clicking the small button next to the repo name.
It can be a bit confusing, but if you are patient with yourself and the site, you’ll figure it out. If after trying for a while, you are still having difficulty, ask a mentor, TA or the instructor for assistance.
Once you’ve got the repo enabled for Travis-CI, there will a web page specifically for your repo, with the url:
where ucsb-cs56-f19/lab07-githubid is the name of your repo. On that page, at the upper right, you should be able to find a button with the text “More Options”. Click on this reveals the following menu:
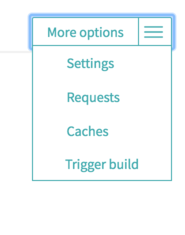
Clicking on the “Trigger Build” option will bring up this pop-up:
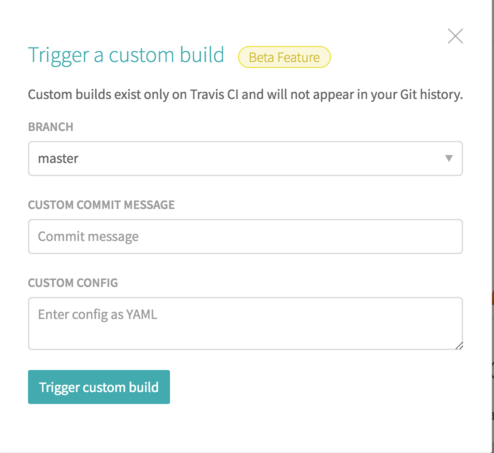
Here, you can trigger a build for any branch, with the master branch being the default. Go ahead and trigger a build for your master branch.
You should be able to see on the Travis-Ci page for your repo that the branch build successfully, all the test cases pass, and that you end up “green on master”. (The color green indicates success, i.e. that all the tests passed.)
If not, try to determine what’s wrong first by checking these things:
- When you type
mvn testlocally, do all the tests pass? - Do you have a
.travis.ymlcommitted on the master branch?
If you aren’t able to figure out what is wrong, seek out help from a mentor, TA, or instructor.
Step 7: First feature branch: xxSmallUIFixes
Step 7a: pull from master
Now, to be sure you have the latest code (in case you changed anything on another computer, or on github), do this in your terminal before proceeding:
git pull origin master
Step 7b: create a feature branch
We will now create a feature branch. The first two letters should be your initials, e.g. pc, ab, etc.
The rest should be SmallUIFixes. So the branch name will be something like pcSmallUIFixes or abSmallUIFixes.
Type this (but not literally xx unless your first and last name both start with x)
git checkout -b xxSmallUIFixes
Step 7c: Write a failing test
Now on this branch, the change we want to make is to change the text for the “brand”, which is the item at the upper left hand corner of the web page (the thing you click to get home).
- The current text is “My-Web-App”.
- We want to change that to “lab07”
So the first thing we do is write a failing test. The test should:
- load the home page
- find that HTML element
- assert that the contents are
"lab07"
When we run that test, it should say that it expected lab07 but found My-Web-App.
Here’s how an experienced developer would write this test:
-
Locate a similar test that already exists in the code.
In this case, the test
getHomePage_hasCorrectTitle()in the filesrc/test/java/hello/HomePageTest.javais a good candidate. -
Find the XPath expression for the HTML element containing
My-Web-App. We can do this by right clicking in the browser on the textMy-Web-Appand choose “Inspect”.In Chrome, at least, this brings up a pane where you can right click on the element, and there is a menu for “Copy”. If you go to that menu, one of the options is “Copy XPath”.
The XPath for this element happens to be:
/html/body/div/nav/a. -
We can now copy/paste the
getHomePage_hasCorrectTitle()test, rename the copied test togetHomePage_hasCorrectBrand().We can then change the code as follows:
From:
.andExpect(xpath("//title").exists())
.andExpect(xpath("//title").string("CS56 Spring Boot Practice App"));
To:
.andExpect(xpath("/html/body/div/nav/a").exists())
.andExpect(xpath("/html/body/div/nav/a").string("lab07"));
This test should fail if we run it, with something like:
java.lang.AssertionError: XPath /html/body/div/nav/a expected:<lab07> but was:<My-Web-App>
Step 7d: Make the test pass
Then, we can make the test pass by replacing the text in that element.
That text lives inside the file src/main/resources/templates/bootstrap/bootstrap_nav_header.html, which is where all of the HTML code for the navigation header can be found.
We can change:
<a class="navbar-brand" href="/">My-Web-App</a>
to
<a class="navbar-brand" href="/">lab07</a>
After this, the test should pass.
We can then commit both the change and the test together in a single commit. This is professional standard practice.
Commit this change.
Step 7e: Do it again
Now, we want to change the text on the first link from “Page 1” to “Earthquakes”.
Write a test that fails. Then make that test pass.
Use the same technique.
Once you have this test passing, make another commit on the xxSmallUIFixes branch.
NOTE:
- Later in this lab, there will places where you’ll change the navigation bar HTML again.
- At each of those points, you may or may not need to modify the tests again.
- If you do, then MODIFY THE TESTS.
I’m NOT GOING TO TELL YOU when that happens, or HOW to modify the tests. That’s one part of the lab that you have to figure out on your own. I’ll just give you these hints:
- The XPath expression looks for a particular element on the page.
- The test you wrote is looking to see if the text in that link is what we expect it to be.
Step 7f: Make a pull request
Now make a pull request for this branch.
When you make the pull request, if Travis-Ci is working properly, you should see a small yellow circle that eventually turns into a green check on the list of commits.
When the pull request shows that the tests have passed, merge the pull request into master.
Step 8: Next feature branch: xxCreateForm
We’ll now create a second branch for creating a form.
Before we create the branch, we need to be sure we are working with a fresh copy of master. So do:
git checkout master
git pull origin master
Step 8a: Next feature branch: xxCreateForm
Then create a new branch called xxCreateForm (as always, xx should be your actual initials, not literally xx, unless your name
is, for example, “Xavier Xie”.)
Step 8b: Create the form
On this branch, we will create a simple HTML form using Thymeleaf.
The form will have two fields in it. It will be a form that allows the user to specify parameters for searching for earthquakes in the last 30 days.
The two parameters will be:
- a distance in kilometers from the UCSB campus
- a minimum magnitude.
For the UCSB campus location, we are using 34.4140°N, 119.8489°W as the latitude and longitude.
- By convention, degrees N are positive, and degrees west are negative
- So in the code, it’s
34.4140, -119.8489 - That probably shouldn’t be hard coded, but that can be a refactor for another time.
Under src/main/resources/templates make a folder called earthquakes so that you have:
src/main/resources/templates/earthquakes.
Copy the file page1.html to a file under src/main/resources/templates/earthquakes called search.html.
In search.html, replace this line of code:
<title>Title of your page goes here</title>
with this:
<title>Earthquake Search</title>
Find the part of the page that reads like this:
<h1>Page 1</h1>

<p>This page is a placeholder.</p>
Replace it with this code, which is a heading and a Thymeleaf form:
 <h1>Earthquake Search</h1>

 <form action="#" th:action="@{/earthquakes/results}" th:object="${eqSearch}" method="get">
            <table>
                <tr class="form-group">
                    <th><label for="distance" class="col-form-label">Distance (km)</label></th>
                    <td><input type="number" th:field="*{distance}" class="form-control" id="distance"></td>
                </tr>
                <tr class="form-group">
                    <th><label for="minmag" class="col-form-label">Minimum Magnitude</label></th>
                    <td><input type="number" th:field="*{minmag}" class="form-control" id="minmag"></td>
                </tr>
            </table>

            <input type="submit" class="btn btn-primary" value="Search">
        </form>
Step 8c: Add a bean that corresponds to the form
Thymeleaf and Spring Boot work with Java Beans to move form information around.
So we need a Java Bean that corresponds to this form.
Create a Java class in the same directory as your other Java code called EqSearch.java.
It should be a plain old Java class with these private data members:
 private int distance;
 private int minmag;
It should also have a no-arg constructor, and getters and setters for each of these fields.
That makes it a “Java Bean”.
Note that the Java Bean naming standards are very strict. With names distance and minmag:
- The getters must be
public intand named:getDistanceandgetMinmag - The setters must be
public voidand namedsetDistanceandsetMinmag
If you vary from this, you’ll have to be sure that the Thymeleaf code is changed accoringly, so be sure that you follow the conventions strictly. Everything has to match, or it just won’t work.
For example, don’t be tempted to use: getMinMag unless you are prepared to make that change everywhere in
all of the Thymeleaf and Java code, consistently.
Finally, be sure this EqSearch.java file is in the same package as the rest of your code. That package is currently hello.
Step 8d: Add a controller method for the form
In order to be able to see this form in the webapp, we need a controller method for it.
In the file WebController.java, add this code:
 @GetMapping("/earthquakes/search")
    public String getEarthquakesSearch(Model model, OAuth2AuthenticationToken oAuth2AuthenticationToken,
            EqSearch eqSearch) {
        return "earthquakes/search";
    }
This code says
- we are going to have an endpoint in the application at the web address
/earthquakes/search - that endpoint will use the HTTP
GETmethod (rather thanPOST, for example).
AGETrequest is the normal way of loading a web page from a URL or a link. - That endpoint takes three parameters
- The first two are needed to support the navigation bar and login/logout; we won’t worry about those for now.
- The third one is the Java Bean that is referred to in the form,
eqsearch. - The fields of that Bean must correspond to the fields in the form (
distanceandminmag).
- The return value corresponds to the HTML template that we defined, without the trailing
.html, i.e.earthquakes/search.htmlinsidesrc/main/resources/templates/.
Test this by running mvn spring-boot:run and by hand entering the web address http://localhost:8080/earthquakes/search and you should see the form. Clicking on it won’t work yet; making that work is a separate step. One step at a time.
Step 8e: Add a menu item that routes to the form.
To make it easier to get to this form, we’ll add a link to it to our navigation bar.
In the file src/main/resources/templates/bootstrap/bootstrap_nav_header.html you should find this code:
            <li class="nav-item active">
                <a class="nav-link" href="/">Home <span class="sr-only">(current)</span></a>
            </li>
            <li class="nav-item">
                <a class="nav-link" href="/page1">Earthquake Search</a>
            </li>
            <li class="nav-item">
                <a class="nav-link" href="/page2">Page 2</a>
            </li>`
This are three <li> elements (list items), each of which:
- starts with
<li>(theliopen tag) - ends with
</li>(theliclose tag)
In case we haven’t mentioned it before: it is important to understand that an HTML element starts with an open tag, ends with a close tag, and everything in between is the elements “content”.
What you’ll be doing is modifying the href attribute on <a> element in the middle <li> so that the code looks like this:
            <li class="nav-item active">
                <a class="nav-link" href="/">Home <span class="sr-only">(current)</span></a>
            </li>
            <li class="nav-item">
                <a class="nav-link" href="/earthquakes/search">Earthquake Search</a>
            </li>
            <li class="nav-item">
                <a class="nav-link" href="/page2">Page 2</a>
            </li>`
Run this, and you should see that there is now a link on the navigation bar that takes you to your page.
HINT: Remember that note at Step 7e about maybe needing to modify tests if/when you modify that navigation bar?
You might want to try running mvn test right now, and if it’s broken, see if you can fix it. Just saying.
Step 8f: Add a controller method for the form results.
Now we need a controller method for displaying the results.
That controller method will look like this:
 @GetMapping("/earthquakes/results")
    public String getEarthquakesResults(Model model, OAuth2AuthenticationToken oAuth2AuthenticationToken,
            EqSearch eqSearch) {
        model.addAttribute("eqSearch", eqSearch);
        // TODO: Actually do the search here and add results to the model
        return "earthquakes/results";
    }
The additional step in this controller method is that we have this line of code:
model.addAttribute("eqSearch", eqSearch);
This allows us to send information to the view (i.e. to the Thymeleaf HTML file) that we can display on the results page.
For now all we are doing is echoing back the information that the user entered. But in a later step, we will replace this comment:
// TODO: Actually do the search here and add results to the model
That comment will be replace with code that actually goes out to the web to get information on earthquakes. We’ll retreive that information and add it to the model. That will make it available in the view.
Step 8g: Add a view for the results page.
The view page results.html will be very similar to the page search.html. Create it in the same directory,
i.e. src/main/resources/templates/earthquakes. Start by copying all of the code from search.html.
Then:
- Change the
titleelement and theh1element to beEarthquake Search Results. - Remove the
formelement entirely. - Replace it with this
tableelement:
         <table>
            <tr>
                <th>Distance (km)</th>
                <td th:text="${eqSearch.distance}"></td>
            </tr>
            <tr>
                <th>Minimum Magnitude</th>
                <td th:text="${eqSearch.minmag}"></td>
            </tr>
        </table>
Now try running (you should restart), clicking on your Earthquake Search link and entering some numbers.
When you click the Search button, you should see the numbers echoed back to you.
If that works, we are ready to add some tests.
Step 8h: Add tests
Note: This step has been updated.
- You’ll need to come back and apply these updates before submitting.
- If you already submitted, no problem; but you still need to do this before the assignment deadline. (Your links are still valid).
- You may do so in a new branch and do a pull request, or directly on master.
Why the update?
As it turns out, because this application is protected with OAuth login, we have to take that into account when writing
unit tests for any endpoint other than the home page ("/").
Otherwise, you’ll get a message such as:
[ERROR] EarthquakeSearchTest.getEarthquakeSearch:38 Status expected:<200> but was:<302>
The 200 is the expected OK status. The 302 is status you get when the server is redirecting the client to another page, in this case the "/login" page.
If you were getting that message, the new code here should fix that. Together with the updates to step 6b, this should get you “green on CI”, that is:
- you should get a green check on your commits
- instead of a red X
Ideally, you write the tests first. But it isn’t always feasible, especially when you are learning a new framework.
A thorough job of testing is a whole lab unto itself, so we’ll just add a few small tests for now.
Let me stress it again: the code here in this step is an inadequate job of testing the code that we’ve added in this step. But it’s at least a start.
First, let’s add a test that makes sure that there is indeed a page at the address /earthquakes/search and that we can
retrieve that page without the server crashing. To do that, we can use the following code, which we’ll put into a file called /src/test/java/hello/EarthquakeSearchTest.java
UPDATE:
Replace the entire contents of /src/test/java/hello/EarthquakeSearchTest.java with this new version.
package hello;

import static org.springframework.test.web.servlet.result.MockMvcResultMatchers.status;

import org.junit.Test;
import org.junit.runner.RunWith;
import org.springframework.beans.factory.annotation.Autowired;
import org.springframework.boot.test.autoconfigure.web.servlet.AutoConfigureMockMvc;
import org.springframework.boot.test.context.SpringBootTest;
import org.springframework.http.MediaType;
import org.springframework.test.context.junit4.SpringRunner;
import org.springframework.test.web.servlet.MockMvc;
import org.springframework.test.web.servlet.request.MockMvcRequestBuilders;
import static org.springframework.test.web.servlet.result.MockMvcResultMatchers.xpath;

import org.springframework.security.oauth2.client.registration.ClientRegistrationRepository;
import org.springframework.boot.test.autoconfigure.web.servlet.WebMvcTest;
import org.springframework.boot.test.mock.mockito.MockBean;
import org.springframework.security.test.context.support.WithMockUser;
import org.springframework.security.oauth2.core.user.OAuth2User;
import org.junit.Before;

import static org.springframework.security.test.web.servlet.request.SecurityMockMvcRequestPostProcessors.authentication;


@RunWith(SpringRunner.class)
@WebMvcTest(WebController.class)
public class EarthquakeSearchTest {

    @Autowired
    private MockMvc mvc;

    @MockBean
    private AuthControllerAdvice aca;

    @MockBean
    private ClientRegistrationRepository crr;

    private OAuth2User principal;

    /**
     * Set up an OAuth mock user so that we can unit test protected endpoints
     */
    @Before
    public void setUpUser() {
        principal = OAuthUtils.createOAuth2User("Chris Gaucho", "cgaucho@example.com");
    }

    @Test
    @WithMockUser
    public void getEarthquakeSearch() throws Exception {
        mvc.perform(MockMvcRequestBuilders.get("/earthquakes/search")
            .with(authentication(OAuthUtils.getOauthAuthenticationFor(principal)))
            .accept(MediaType.TEXT_HTML))
            .andExpect(status().isOk())
            .andExpect(xpath("//title").exists())
            .andExpect(xpath("//title").string("Earthquake Search"));
    }
}
UPDATE:
This is an entirely new file you should add to your project.
We also need the following file, which you should put into /src/test/java/hello/OAuthUtils.java. This file is adapted from code describing in this article about testing OAuth secured Spring Boot Applications and that appears in this repo
package hello;

import org.springframework.security.core.Authentication;
import org.springframework.security.core.GrantedAuthority;
import org.springframework.security.oauth2.client.authentication.OAuth2AuthenticationToken;
import org.springframework.security.oauth2.core.user.DefaultOAuth2User;
import org.springframework.security.oauth2.core.user.OAuth2User;
import org.springframework.security.oauth2.core.user.OAuth2UserAuthority;

import java.util.Collection;
import java.util.HashMap;
import java.util.Map;
import java.util.Set;
import java.util.HashSet;


/**
 * Utility methods for testing OAuth protected endpoints.
 * <a href="https://github.com/mark-hoogenboom/spring-boot-oauth-testing">
 * https://github.com/mark-hoogenboom/spring-boot-oauth-testing
 * </a>
 */

public class OAuthUtils {

    public static OAuth2User createOAuth2User(String name, String email) {

        Map<String, Object> authorityAttributes = new HashMap<>();
        authorityAttributes.put("key", "value");

        GrantedAuthority authority = new OAuth2UserAuthority(authorityAttributes);

        Map<String, Object> attributes = new HashMap<>();
        attributes.put("sub", "1234567890");
        attributes.put("name", name);
        attributes.put("email", email);

        Set<GrantedAuthority> authorities = new HashSet<GrantedAuthority>();
        authorities.add(authority);

        return new DefaultOAuth2User(authorities, attributes, "sub");
    }

    public static Authentication getOauthAuthenticationFor(OAuth2User principal) {

        Collection<? extends GrantedAuthority> authorities = principal.getAuthorities();

        String authorizedClientRegistrationId = "my-oauth-client";

        return new OAuth2AuthenticationToken(principal, authorities, authorizedClientRegistrationId);
    }
}
UPDATE:
You need this change to the pom.xml
We also need a new depenedency in the pom.xml. Add it into the <dependencies> section, in between two other <dependency> elements.
        <dependency>
            <groupId>org.springframework.security</groupId>
            <artifactId>spring-security-test</artifactId>
            <scope>test</scope>
        </dependency>
UPDATE:
You need this change in /src/main/resources/template/earthquakes/search.html
Unless you started the lab very late, if you run the tests at this point with mvn test, you’ll discover that they may still be failing, because one other change is needed.
The reason is that the packages we are using to do unit tests on the HTML code are very picky about the formatting of the HTML.
If you already created the form in /src/main/resources/template/earthquakes/search.html before the typos were fixed, your input elements are “not properly closed”. That is, they look like these:
<td><input type="number" th:field="*{distance}" class="form-control" id="distance"></td><td><input type="number" th:field="*{minmag}" class="form-control" id="minmag"></td><input type="submit" class="btn btn-primary" value="Search">
However, they should look like this instead. The change is subtle, but crucial. While most web browsers just silently ignore the error, and everything looks fine, in fact, the HTML above is malformed. The fix is to add a / just before the end of each <input> tag so that it becomes a “self-closing” element.
<td><input type="number" th:field="*{distance}" class="form-control" id="distance" /></td><td><input type="number" th:field="*{minmag}" class="form-control" id="minmag" /></td><input type="submit" class="btn btn-primary" value="Search" />
Fix each of these typos in /src/main/resources/template/earthquakes/search.html
At that point, your mvn test should return no test failures. When that’s true, do a commit.
UPDATE:
Be sure that you commit and merge the changes above, and that it gets you “green on Travis-CI”.
Step 8i: Pull request
Do a pull request from your xxCreateForm branch into master.
You should then merge that pull request into master.
Step 9: Next feature branch: xxCallAPI
In this step, we’ll make yet another branch where we do something useful with the information on the results page. We’ll make a call to an API that provides information in JSON format.
In this step we’ll only echo that JSON information on the page; it won’t yet be in a format that is pleasing to an end user. But we’ll be able to see that we are making progress.
Step 9a: Create xxCallAPI branch.
To start, you need to checkout master and make a new branch. As always, your initials, not xx.
git checkout master
git pull origin master
git checkout -b xxCallAPI
We have to checkout master and do git pull origin master to pick up the changes that were
made in the previous pull request for xxCreateForm.
Do a git log command to be sure that you see all of those commits before proceeding.
Step 9b: Add an EarthquakeQueryService that generate fake data for now.
For this step, we will use the idea that a commit can be more than just a way of organizing your changes to a project. Rather walk you through the changes you need to make, I will refer you to a commit that shows you the changes needed.
That commit is here:
In this commit, you see that:
- There is a new file called
src/main/java/hello/EarthquakeQueryService.java. You should create a file like this one and add it to your code base. This is a placeholder for the code that will get the Earthquake data in JSON format. (At a later step, we’ll add in the code that retrieves the information.) - There are also some changes to
src/main/java/hello/WebController.java. These changes call out to the newEarthquakeServiceobject and retrieve the information in JSON format. We store that into an attribute in the model calledjson. - Finally, we see that we’ve modified the
src/main/resources/templates/earthquakes/results.htmlfile by adding in a<pre>element with theth:textattribute. Theth:textattribute value of"${json}"will fill the<pre>element with the value of thejsonattribute in the model, replacing theThis is placeholdertext.
Make all of these changes to your code, and then run the application. You should see that
when you type in values in the search form, you now get a results page that shows the “fake json”
returned by the EarthquakeQueryService object.
Do a commit of these changes. Use an appropriate commit message that explains what you did, and why.
Note: "I made the changes the lab said to make" is not what we are looking for here.
Something more like:
xx - Added placeholder EarthquakeQueryService and wired it up to results formxx - Added service that will eventually get earthquake data
Describe the changes in whatever way makes sense to you, and would convey to a reader what the purpose of the changes is. Of course you have to understand the purpose of the changes before you can do that.
Step 9c: Make the EarthquakeQueryService retrieve real data.
The next step is to make the EarthquakeQueryService retrieve real data.
The way to do that is illustrated in this commit:
Here we see that we are using the RestTemplate object that is built into Spring Boot to
do an API call, and return the JSON string.
If you would like more information on what is happening in this code, the following article provides more details. You are encouraged to look over that as/when you need to adapt the code here for accessing other APIs.
For now, though, just make the indicated changes. You should see that with these changes, when you run the application, it now retrieves JSON for earthquakes at the specified distance and minimum magnitude, and displays that JSON in the results form.
Commit this code with an appropriate commit message that explains what change you made and why. Again, it should be a message that reflects an understanding of the code:
- Not Good:
"xx - made step 9c changes" - Better:
"xx - added code to retrieve earthquake data from USGS web service"
Step 9d: Pull Request
Do a pull request for this branch to master. In the description of the pull request, enter a brief explanation of what these two commits, as a group, do to improve the code and/or the working website.
Then accept the pull request.
Step 10: Next feature branch: xxJavaObjects
In this final step, we’ll learn how to transform that JSON string into usable Java objects, and use those Java objects to put useful information on the page.
Step 10a: Create object for the top level GeoJSON returned
Under the directory src/main/java/hello, create a subdirectory called geojson.
We will be putting the classes that represent the JSON objects into a package called hello.geojson.
Putting them into a separate package is a way of keeping them together, and keeping the code organized.
The JSON returned is a specific format called GeoJSON, described here: https://geojson.org/ and in this specification: https://tools.ietf.org/html/rfc7946.
As explained in that specification, there are three kinds of GeoJSON objects:
- Geometry
- Feature
- Collection of Features
The JSON we get back is this last kind, a “FeatureCollection”. We’ll write a plain old Java Object that represents this FeatureCollection.
Our job initially is to just represent the top level fields in this object that are basic data types: int, String, boolean, etc. Anything that is an array or an object, we’ll leave to a later stage.
We are also, (perhaps controversially), initially going to just use public data members rather than writing getters and setters for each field. This simplifies our coding greatly.
So, the Java class will look like this:
package hello.geojson;

public class FeatureCollection {
  public String type;
}
That’s it! Everything else at the top level of the JSON returned is an array or an object, so we’ll leave that off for now.
We won’t commit this yet. We have a bit more code to write first.
Step 10b: Write method to convert JSON to Object
When converting JSON to Java Objects, we only need to write a method for the top level object.
FeatureCollection will be our top level object. So we’ll add a method to the FeatureColleciton class to convert
the JSON representation of a Feature Collection into a FeatureCollection object.
We’ll need to add these imports into FeatureCollection.java
import com.fasterxml.jackson.databind.DeserializationFeature;
import com.fasterxml.jackson.databind.ObjectMapper;
import com.fasterxml.jackson.core.JsonProcessingException;
We’ll also need this additional depenedency in our pom.xml
        <dependency>
            <groupId>com.fasterxml.jackson.core</groupId>
            <artifactId>jackson-core</artifactId>
            <version>2.10.0</version>
        </dependency>

        <dependency>
            <groupId>com.fasterxml.jackson.core</groupId>
            <artifactId>jackson-databind</artifactId>
            <version>2.10.0</version>
        </dependency>
We may also find it helpful to add logging into this class, so let’s add the code for that.
We need these two imports:
import org.slf4j.Logger;
import org.slf4j.LoggerFactory;
And this declaration just inside the top of the FeatureCollection class. This declaration
gets us a logger instance to which we can log information. The getLogger method always takes
the name of the class in which it appears, followed by .class, so in this case FeatureCollection.class:
private static Logger logger = LoggerFactory.getLogger(FeatureCollection.class);
Now, we add a method to convert JSON into a FeatureCollection object. That method looks like this:
 /**
     * Create a FeatureCollection object from json representation
     *
     * @param json String of json returned by API endpoint {@code /classes/search}
     * @return a new FeatureCollection object
     * @see <a href=
     *      "https://tools.ietf.org/html/rfc7946">https://tools.ietf.org/html/rfc7946</a>
     */
    public static FeatureCollection fromJSON(String json) {
        try {
            ObjectMapper objectMapper = new ObjectMapper();
            objectMapper.configure(DeserializationFeature.FAIL_ON_UNKNOWN_PROPERTIES, false);

            FeatureCollection featureCollection = objectMapper.readValue(json, FeatureCollection.class);
            return featureCollection;
        } catch (JsonProcessingException jpe) {
            logger.error("JsonProcessingException:" + jpe);
            return null;
        } catch (Exception e) {
            logger.error("Exception:" + e);
            return null;
        }
    }
At this point, we should be able to convert a JSON String into a FeatureCollection object.
One of the key lines of code here is this one:
objectMapper.configure(DeserializationFeature.FAIL_ON_UNKNOWN_PROPERTIES, false);
This line of code configures our ObjectMapper instance so that if there is a property in the JSON that doesn’t match any
field in our Java object, it will just ignore that field instead of throwing an exception.
The downside of this is that we might be missing some fields, or there could be mismatches that we don’t catch. But the advantage is that we can implement the fields in the JSON a little bit at a time, testing as we go, rather than having to do it all at once.
Step 10c: Use object to display results
We can now try using our FeatureCollection object. It won’t be very exciting because we won’t yet be able to format a list of earthquakes. But we will be able to check that all of the parts are wired up correctly.
Back in WebController.java, find these lines of code:
        model.addAttribute("eqSearch", eqSearch);
        String json = e.getJSON(eqSearch.getDistance(), eqSearch.getMinmag());
        model.addAttribute("json", json);
        return "earthquakes/results";
We are going to put two more lines of code immediately before the return:
        FeatureCollection featureCollection = FeatureCollection.fromJSON(json);
        model.addAttribute("featureCollection",featureCollection);
These two lines of code:
- convert the JSON into a Java object
- add that object into the model so that we can access it in the view
You will need to add an import for FeatureCollection since it is in a different package:
import hello.geojson.FeatureCollection;
To see if it worked, we need to add some code in the view that uses this. Inside results.html, we’ll add
this code right after the <pre> element where we display the JSON:
        <h2> Results</h2>

        <table>
            <thead>
                <tr>
                    <th>Type</th>
                </tr>
            </thead>
            <tbody>
                <tr>
                    <td th:text="${featureCollection.type}"></td>
                </tr>
            </tbody>
        </table>
The part of this that is most important is the <td> element with the attribute th:text.
Here, we are referencing featureCollection which was added to the model by this code in WebController.java:
model.addAttribute("featureCollection",featureCollection);
Because featureCollection is an instance of the class FeatureCollection and it has a public data member
called type (this would also work if it had a public getType method), we can
use ${featureController.type} to access this value in the Thymeleaf HTML template.
Try it out and see if it works. If it does, you should see the string FeatureCollection come up as the
value of ${featureCollection.type} when you view the results page.
The next step is to unpack the array of Feature objects. But first, let’s commit the code we already
have.
What we’ve done here is to set up a conversion from JSON objects to
Java Objects, and that we’ve demonstrated that we can get values from it in the view.
A good commit message would summarize that succintly.
Step 10d: Create object for the Metadata and display it
The next step is pretty straightforward, and pretty magical.
We just have to look at the structure of the JSON, and create Java objects that match that structure.
- Any time we see an JSON Object (i.e. a new set of
{}with key/value pairs), we need to create a Java Object to match. - Any time we see a JSON Array (i.e. a set of
[]with values or object inside), we need to create ajava.util.List<>of the appropriate object.
So, for example, in our FeatureCollection object, the second key in the object is metadata. That key refers to an object, in particular, this one:
"metadata" : {
   "generated":1573772980000,
   "url":"https://earthquake.usgs.gov/fdsnws/event/1/query?format=geojson&minmagnitude=2&maxradiuskm=100&latitude=34.414000&longitude=-119.848900",
   "title":"USGS Earthquakes",
   "status":200,
   "api":"1.8.1",
   "count":29
}
We can create an class called Metadata in a file src/main/java/hello/geojson/Metadata.java with the appropriate fields of the appropriate types:
package hello.geojson;

public class Metadata {
  public long generated; // need a long for very large ints
  public String url;
  public String title;
  public int status;
  public String api;
  public int count;
}
Once we’ve done that, we can add this field to the FeatureCollection class:
public Metadata metadata;
With that, we should be able to add these new fields to the table in our view. In this example, I’ve added only two of them, but you can see how we could add the rest.
The <th> elements are table header elements, and just contain the column headings. The <td> elements
are table data elements and contain the actual data.
        <table>
            <thead>
                <tr>
                    <th>Type</th>
                    <th>Url</th>
                    <th>Count</th>
                </tr>
            </thead>
            <tbody>
                <tr>
                    <td th:text="${featureCollection.type}"></td>
                    <td th:text="${featureCollection.metadata.url}"></td>
                    <td th:text="${featureCollection.metadata.count}"></td>

                </tr>
            </tbody>
        </table>
Commit these additional changes before moving on.
Step 10e: Handle the list of features
Let’s now do the same thing for the next field in our FeatureCollection object, which is features in the
JSON. That field is an array of feature objects. Each feature object has these fields (I’ve actually omitted
some for space, and because we really don’t need them all.)
{
  "type":"Feature",
  "properties": {
    "mag":2.5899999999999999,
    "place":"13km SSW of Lompoc, CA",
    "time":1573538207960,
    "updated":1573702694943,
    "tz":-480,
    "url":"https://earthquake.usgs.gov/earthquakes/eventpage/ci38239258",
    "detail":"https://earthquake.usgs.gov/fdsnws/event/1/query?eventid=ci38239258&format=geojson",
    ...
    [SOME FIELDS OMITTED]
    ...
    "type":"earthquake",
    "title":"M 2.6 - 13km SSW of Lompoc, CA"
  },
  "geometry": {
    "type":"Point",
    "coordinates":[-120.52800000000001,34.536333300000003,5.4400000000000004]
  },
  "id":"ci38239258"
}
For the Feature object, most of the interesting stuff is inside the Properties. So we’ll need to make a Java
object for both the Feature and the Properties.
The Properties object will look very similar to the Metadata object, but this time, instead of putting in
all of the properties, we are only going to put in the ones we have an immediate use for. Others can be added
later as they are needed. Put this in a file Properties.java under the hello.geojson package:
package hello.geojson;

public class Properties {
  public double mag;
  public String place;
  public String type;
  public String title;
}
The Feature.java file will be similar:
package hello.geojson;

public class Feature {
  public String type;
  public Properties properties;
  public String id;
}
With these in place, we can put the features array into the FeatureCollection class. Add this code
to FeatureCollection.java:
public List<Feature> features;
You’ll need an import for java.util.List in FeatureCollection.java.
Now, we’ll use these new fields to display some results. We’ll hold off on a commit until we see whether that works. That’s in the next step.
Step 10f: Use those objects to display results
For this step, we’ll need to know how to loop in Thymeleaf.
We are doing to make a separate table for the list of all of the earthquake results that will loop over
each of the Feature objects in the List<Feature> features member of featureCollection.
Here’s what that table will look like. We’ll put this table in results.html after all of the other ones, right before this line of
code:
<div th:replace="bootstrap/bootstrap_footer.html"></div>
That line of code, by they way is the “footer” for the page, so clearly everything else should go before it.
Here’s our Earthquake table:
        <h3>Earthquakes</h3>
        <table>
            <thead>
                <tr>
                    <th>id</th>
                    <th>place</th>
                    <th>mag</th>
                </tr>
            </thead>
            <tbody>
                <tr th:each="f: ${featureCollection.features}">
                    <td th:text="${f.id}"></td>
                    <td th:text="${f.properties.place}"></td>
                    <td th:text="${f.properties.mag}"></td>
                </tr>
            </tbody>
        </table>
The most important new line of code here is this one:
<tr th:each="f: ${featureCollection.features}">
The th:each construct here is like a “foreach” loop that sets up f as a variable that loops over the features member of featureCollection. The <tr> element in which it occurs will be repeated as many times as there are elements in the List<Feature> object to which featureCollection.feature refers.
In that way, we get a table of all of the earthquakes.
Try it out and see if it works.
If not, debug what is wrong. If it does work, make a commit.
Step 10g: Now you do some work: add a field
Now, see if you can add something without any instructions as to how to write the code, just working from what you’ve seen so far.
In the table element that contains the metadata on the results.html page, add another column for title.
This field is already in the Metadata java object; you just need more code in the view.
Make a commit for this that indicates that you added title to the metadata.
Step 10h: A little more work: make id clickable
Next, in the table for the earthquakes, make the id field a clickable link. To do this, you’ll need to do two things:
- Add the
urlfield from the Feature JSON in the appropriate place in the Java code. This field has a link to information about the earthquake. - Replace the
<td>element for the id field with some HTML that makes it a link.
Here is a hint. The <td> element for id currently looks like this:
<td th:text="${f.id}"></td>
Afterwards, it should look something like this
(except I haven’t told you what to put inside the { }:
<td><a th:href="${ }" th:text="${f.id}"></a></td>
The <a> element makes a link. The th:href is where the url goes. The th:text is the
text that becomes the clickable link.
See if you can get this part working. Once you do, make a commit with an appropriate message that indicates that the id is now a clickable link.
Step 10i: Last cleanup things
A few last cleanup items:
- Remove the
<h2>header forJSON Resultsand the `<pre> element for the JSON. We don’t need those anymore. - In the metadata section, remove the
typecolumn. - Move the title column to the first position (left most), and make it a clickable link to the url
(removing the url field) just like you did with the id field in the previous step.
- Clarification: There are two tables. One is the table with metadata, and the other is the table with one row per earthquake. I’m talking here about the metadata table. The idea is to move the “title” field to the left, and make it be a link that links to what the url field had in it. The syntax is similar to what you did in the table with the earthquake detail, when you made id a clickable link.
- Combine the
distanceandminmagfields into the same table with the metadata, and remove the first table. - On the opening
<table>tags, change them to<table class="table">. This will bring in the Boostrap CSS that makes the tables look much nicer. - Remove
Page 2from the Navigation header (andPage 1if it is still there). You don’t have to remove the template files and the controller methods; just remove the links to them in the file where the navigation header is defined. (If you’ve forgotten how, look back at earlier steps.)
HINT: Remember that note at Step 7e about maybe needing to modify tests if/when you modify that navigation bar?
Removing Page 2 from the Navigation header counts.
You might want to try running mvn test right now, and if it’s broken, see if you can fix it. Just saying.
Do a commit for these cleanup items.
Step 10j: Pull Request
Finally, do a pull request from the xxJavaObjects branch.
Accept the pull request. Then, you are almost done!
Step 11: A small fix to application.properties
There is one final change to make (if you haven’t done it already).
The GitHub login/logout is supposed to show your status in the GitHub organization ucsb-cs56-f19, either
as an admin, a member or a guest. However, this doesn’t work properly unless you add this line into your
application.properties file:
CORRECT:
spring.security.oauth2.client.registration.github.scope: user,read:org
This should replace this incorrect line which may be there in the starter code:
INCORRECT:
spring.security.oauth2.client.registration.github.scope: "read:user", "read:org"
Add this in. For this small change, you may just do a commit directly on the master branch.
If you’d like to understand more about what this change means, you can read more about OAuth Scopes here: https://developer.github.com/apps/building-oauth-apps/understanding-scopes-for-oauth-apps/.
Before you do, you should accept your previous pull request(s), and then do:
git checkout master
git pull origin master
Test it, and make sure that when you logout and login, you see member by your username.
You can ask a TA, mentor or instructor to try your app as well. They should see admin when they login.
Step 11: Login into Heroku and deploy your Master Branch
Back in lab07a, you created a Heroku app for lab07.
Login into the Heroku dashboard, find that app, and deploy your master branch from Github to that app.
Then visit the app on Heroku and make sure it works there as well.
Step 12: Update your javadoc and jacoco report
To update your javadoc and jacoco report, do this:
mvn clean
mvn javadoc:javadoc
mvn javadoc:test-javadoc
mvn test
mvn jacoco:report
mvn site
mvn site:deploy
git add docs
git commit -m "xx - update javadoc and jacoco report"
git push origin master
Check that your README.md has a link to your GitHub pages webpage, and that the webpage is published.
Lucky Step 13: Revisit steps 6b and 8h, and revisit the step 7e hint, for good luck.
Depending on when you started this lab, Steps 6b and 8h might not have been complete at the time you did them. If not, you might be getting ugly red X’s on your commits instead of nice green checks.
Steps 6b and 8h fix the code so that the unit tests pass on Travis-CI and we get a nice green check instead of the ugly red X.
These steps go pretty quickly. Please go back and do them now if you didn’t do them before. Either way, double check.
Also, revisit the hint at Step 7e. There were some small adjustments to the Navigation bar, and the instructions about changing it and testing it. You want to make sure you are update to date on all of those.
Final Step: Submitting your work for grading
When you have:
- a running web app
- your code is green on CI
- you have an updated GitHub page for javadoc/jacoco
Then you are probably ready to submit on Gauchospace.
BUT BEFORE YOU DO:
- Check that your lab07 web app runs on Heroku.
- Check that you deployed your latest version of master to your Heroku app
- ACTUALLY check that you can log out and log back in, and that you can retrieve Earthquake results.
- I found some lab07 instances on Heroku that were redirecting back to lab06.
- That suggests the author tried to reuse their client id and client secret from lab06 instead of creating a new one.
- You have to create a new one any time the URL changes, which means different client-id/client-secret for:
- localhost
- lab06 on Heroku
- lab07 on Heroku
- Check that your
README.mdhas a correct link to your GitHub pages documentation and that it is updated. - Check that your
README.mdhas a correct link to your running Heroku app. - Check that you revisited steps 6b and 8h, and that you made the necessary changes so that your submission is green on Travis-CI.
- Check that you have all of the tests that were required by the lab and that your test cases pass locally (with
mvn test) and on Travis-CI.
Then, finally visit https://gauchospace.ucsb.edu/courses/mod/assign/view.php?id=2801389&forceview=1 and make a submission.
In the text area, enter something like this, substituting your repo name and your Heroku app name:
repo name: https://github.com/chrislee123/spring-boot-minimal-webapp
on heroku: https://cs56-f19-lab07b-chrislee123.herokuapp.com
Then, and this is super important, please make both of those URLs clickable urls.
The instructions for doing so are here: https://ucsb-cs56.github.io/topics/gauchospace_clickable_urls/
Grading Rubric:
| Points | Item |
|---|---|
| 10 | Repo is set up for Travis-CI |
| 10 | The app runs on Heroku |
| 10 | There is a form at /earthquakes/search where you can type in distance and minimum magnitude |
| 10 | There is a menu item that takes you to the earthquakes/search endpoint |
| 10 | When you submit the form, you can see information about Earthquakes near UCSB |
| 10 | The id link of each earthquake is clickable |
| 10 | There are pull requests for branches xxSmallUIFixes, xxCreateForm, xxCallAPI, rather than the changes just all being made on the master branch |
| 10 | Comments on commits are reasonably descriptive |
| 10 | Javadoc and Jacoco are published and linked to from README.md |
| 10 | All other instructions were followed (e.g. clickable links on Gauchospace, cleanup items at step 10i, etc. |